Friday, November 30, 2018

ReWordify - Making tough to read text accessible to all students

Rewordify is a website that automagically rephrases hard to understand text and creates various learning activities to build reading comprehension. The first three teachers I showed Rewordify.com to had these reactions:  
  • "I need this for a lesson tomorrow"
  • "OMG, you don't know how you just saved me hours"
  • "That's nice"  -- It's not for everyone.


So that is the pitch of the site, created by a teacher, and eschewing {ahem: avoiding...according to rewordify} corporate influence or even the freemium model.  All Free...forever.

What does Rewordify do?

  • Rewordify.com intelligently simplifies difficult English text (link)
  • It recognizes over 58,000 difficult words and phrases, and changes them to simpler versions for better understanding and comprehension based on context 
  • You can change the difficulty level of the words that are simplified, and the way that the site rewords text, in dozens of different ways via the "Settings" page.
  • The site has a huge library of most pieces of classic literature that can be simplified as needed
  • The site dynamically teaches students vocabulary based on any block of text via Learning Sessions, which continuously checks for understanding and reteaches until mastery is reached.
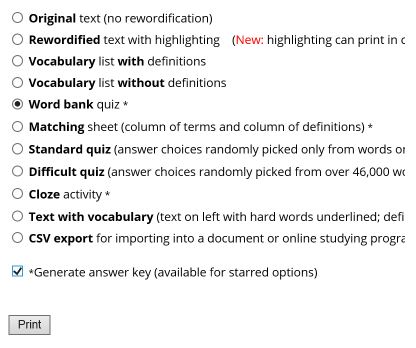
  • You can create free vocabulary lists, quizzes, and other vocabulary learning materials for any block of text you paste into the site.
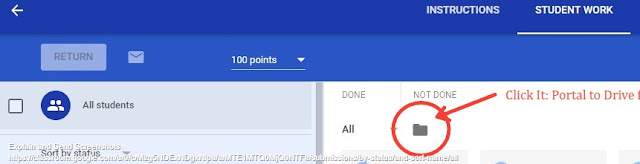
  • If you want to track your students the free Educator Central feature package lets educators create student accounts, create assignments, and easily monitor their students' reading and learning.


Who is Rewordify for?

  • Anyone that uses text to provide content to students.
  • Students needing extra help
  • English Language Learners
  • Students struggling with vocabulary
  • Teachers that would like to create printable vocabulary practice and quizzes

Follow this link to see the demo and get started.

Enjoy your life!

Tuesday, October 23, 2018

Team Drives in Google Drive

Image result for team drives g suite

Team Drives is now turned on in our G Suite for Education Accounts

What is Team Drives?

Team Drives is a shared space where teams can easily store, search, and access their files anywhere, from any device. Unlike files in My Drive, files in a Team Drive belong to the team instead of an individual.

How is Team Drives different from M: drive or other shared drives?

  1. Created and administered by anyone given access 
  2. All documents are "owned" collectively
  3. Changes to files are changed for everyone


Why create a team drive?

  1. Share files relevant to most or all of a department, team or collaborative group (co-teachers, colleagues teaching the same class, etc.)
  2. Organize files with a consistent theme.

Get Started:  Go to drive and right click on Team Drives

Set Permissions:  Right click on the name of the drive you created


Caveats:  

  • Once a document is placed in Team Drives...it is owned by the group.  Make a copy of a personal file before placing in Team Drives
  • Certain files types like google maps cannot be stored in Team Drives
  • Team Drives is NOT turned on for students.  In most cases, you can create a folder in My Drive and share it with students, giving them either edit or view only access.
Follow this link for more tutorials on Team Drives

Friday, October 5, 2018

Using your Keyboard: The Windows Flag Key

Using your Keyboard:  The Windows Flag Key


Image result for windows key

Here are a few Windows Key Shortcuts that will save you a few clicks.


  1. Windows Key + D = Display Desktop - no need to minimize each window one by one or use the desktop button next to the date and time...just Window + D


2.  Windows Key + W = Show Windows Ink Options - This allows you to DRAW on a whiteboard or a screenshot of your computer without special software like Smart Notebook.  You can also click on the ink pen in your toolbar tray (right click to make sure it is on)


Final Friday Sendoff...

3.  Windows Key + L = Lockout - no more Ctrl + Alt + Delete + enter or click to lock your computer.

For a full list of Windows key shortcuts....


Enjoy your life!


Monday, September 17, 2018

Transit Dashboard and Google Classroom Updates


Today's Tips involve the Transit Dashboard and Google Classroom

The Transit Dashboard is a weblink that contains documents sent out to all staff through email...all in one place.   Documents like the School Calendar, meeting schedules and tech tips.

To get the most use out of the TMS Dashboard, bookmark it in your browser or create a shortcut on your phone's home screen for quick access.

TMS Dashboard

If there are documents you think should be on the site, upload them to Google and share with Amy Girling and Larry Goble with a note about the TMS Dashboard.  

Image result for google classroom


As you have started your year you may have noticed that Google Classroom has changed quite a bit.  If you haven't figured out the where to put stuff or why it is better here is a brief list and a presentation if you want more details.

Google Classroom updates:

  • New Classwork  and Stream Tab: Use the Stream tab sparingly for announcements or class discussions...commenting back and forth.  Use the Classwork tab to post all assignments, materials and organize in topics

  • Topics: In the classwork page you should 99% of the time use a topic.  These topics are like Unit headers and will keep all your assignments/questions/material for that unit together.  You can change the order of the topics and the order of the posts within each topic.  Anything you don't assign to a topic will live at the top and annoy you.

  • No About Tab:  We previously used the about tab to post static information and get the class code and add teachers.

  • Classcode and Co-teachers: In the Settings gear

  • Materials posting option: Along with assignment and question you can also post a material.  Use this when you are handing out a view only doc that isn't connected to a grade or comment.  Those things like a syllabus that you used to post in the ABOUT tab can be posted as Materials in the Classwork tab without a topic and they will stay at the top of the stream for easy access.

  • Grading Frame: When opening a students assignment for commenting/grading google classroom will default open it in a special Grading Frame.  In this frame you can see the student doc, comment, assign a grade and click an arrow to see the next students doc.  This is much more convenient than opening and closing multiple files and having different places to comment and assign the grade.
There are a few more subtle changes covered in the slides below but those are the major ones.  As always...those are my tips...but I have been wrong before.

Let me know if you need anything.  


Google Classroom Updates

Image result for google classroom
As you have started your year you may have noticed that Google Classroom has changed quite a bit.  If you haven't figured out the where to put stuff or why it is better here is a brief list and a presentation if you want more details.

Google Classroom updates:

  • New Classwork  and Stream Tab: Use the Stream tab sparingly for announcements or class discussions...commenting back and forth.  Use the Classwork tab to post all assignments, materials and organize in topics

  • Topics: In the classwork page you should 99% of the time use a topic.  These topics are like Unit headers and will keep all your assignments/questions/material for that unit together.  You can change the order of the topics and the order of the posts within each topic.  Anything you don't assign to a topic will live at the top and annoy you.

  • No About Tab:  We previously used the about tab to post static information and get the class code and add teachers.

  • Classcode and Co-teachers: In the Settings gear

  • Materials posting option: Along with assignment and question you can also post a material.  Use this when you are handing out a view only doc that isn't connected to a grade or comment.  Those things like a syllabus that you used to post in the ABOUT tab can be posted as Materials in the Classwork tab without a topic and they will stay at the top of the stream for easy access.

  • Grading Frame: When opening a students assignment for commenting/grading google classroom will default open it in a special Grading Frame.  In this frame you can see the student doc, comment, assign a grade and click an arrow to see the next students doc.  This is much more convenient than opening and closing multiple files and having different places to comment and assign the grade.
There are a few more subtle changes covered in the slides below but those are the major ones.  As always...those are my tips...but I have been wrong before.

Let me know if you need anything.  


Friday, April 13, 2018

Windows Searching and Drive Previews


1) DON'T SCROLL...search.

When in a folder in Windows many of us use the scroll wheel on the mouse to peruse the files until we come upon the one we need.  Here are two tips to do it faster.

If you know the name or part of the name of the file follow these steps
              1. Click on the Drive or the folder you think the file is in
              2. Use the search bar in the upper right and enter part of the name of the file (truncate it at first and then narrow the search by adding letters until you find the right fill.

Ex. Want to find Lunch Duty roster

1) Click on H: Drive and 2) Search for DU

Bonus:  When in a folder full of files, if you know the first letter of the file, just click on any file and then the first letter and it will take you to that section or if the files aren't sorted by name just keep tapping the letter and it will hop from one file with that letter to the next.


2) EZ Preview of student work in G Drive

When collecting student work in G Classroom sometime you want to check on student work but not take the time to open EVERY document. Here's how to do it?
  1. In the google Classroom Assignment, look for the folder at the top.  This is the portal to the folder in Drive where all the student assignments are actually stores.  Click on it.


    2. In the Drive folder, simply one-click on the first document and then click on the preview eye in the Drive tools bar.


3. Now scroll through the docs easily with the right and left arrows on the screen.


Thursday, March 1, 2018

Teaching in Pictures for Generation Z

Weekly Tech Tips


Did you know that there aren't any millennials in our classrooms anymore?  Generation Z started around the year 2000 or before, some have already passed through our schools.  Did you miss it...I did.
Take a look at the differences below. 


Image result for millennials text per day

The one that stood out to me is the "Communicate with images" vs. "Communicate with text"...Whoa!  I remember fretting that students were writing so many texts (50, 60...100s per day).  But now if we look around students are constantly snapping pictures for Snap Chat and Instagram.  They communicate with Images.                                                                                                                                                                                                              The question I asked myself was, "How do I lesson plan for Generation Z?"  One sure thing is that I want to use more images.  Three ways that images can be incorporated into good lesson design are through social learning activities on Padlet, enlightening gif directions, and student made infographics.  

PADLET

Padlet is a Digital Bulletin board that allows student thinking to be presented publicly in visual format.
This is great when you want to see all your students work in one place, for students to see each others and for multiplying learning opportunities.


Lesson Examples: 

Imagine teaching students to solve a math problem or write a thesis statement.  As a good teacher you want to check their understanding with an Exit ticket.  Each student writes the math problem or thesis down and turns it in.  Hopefully you have enough time to give good feedback to each student and for each student to read and understand the feedback.   There are a lot of maybes involved.  
What if, instead, students entered their sample math problems/thesis statements on a padlet?  The next day each student's warm-up activity is go to the padlet and read the math problem/thesis statement and vote for the best one.  Each student now has seen not just the teacher's example and their own but 25 others plus a class discussion on why the top vote getters were valued as the best...thus multiplying learning opportunities.

Padlet Samples


Enlightening GIF Directions

If a picture is worth a 1000 words then a GIF (a repeating, moving picture) is worth...  When you add GIFs to a list of step by step instructions you allow for a easy way for Generation Z to understand what they are supposed to do.
GIFs can be made from a series of images or from a video at ezgif.com or you can search for gifs on google as seen if the GIF below. 

Google Slides and Docs both support GIFs which along with your bitmoji and digital stickers, will really add to your Gen Z cred.  Sample directions slides.

Student Made Infographics

Infographics are essentially information in pictorial form.  Graphs, charts images and text coming together in an explanatory way.  As with many learning activities the teacher could synthesize the information into a graphic and it would help understanding BUT if students each do their own work we vault to the top of the Bloom's ladder and increase student learning potential.  Here are some student examples from recent projects. 

Try it out with easy to use templates at piktochart or canva or make your own in Google Drawings.